Tuesday, September 13, 2011

Inspiration Nation

Hello lovely friends!

I just wanted to share a small post about one of my favorite blogs, design*sponge. The creator of the blog is Grace Bonney. She is brilliant and oh so fabulous. Grace just came out with this beautiful book which is, from what I understand, a consolidation of her blog thus far!

Source

I can't wait to purchase and blog about it! She is my inspiration. Watch the book trailer and you will understand why..


Design Sponge at Home (Official Book Trailer) from The Panic Room Videos on Vimeo.

Grace will be in Dallas on October 13th and I am so sad to say that I will not be able to go as I am planning an event for my schools Journalism and Mass Communications department that will take place on that day. But I encourage all blog lovers to attend if you can! Meeting her would be life changing.

Thanks for reading!
Bye bye

Saturday, September 10, 2011

Fall For Me

This weeks weather was so wonderful! Not a day above 100 and the mornings and evenings were in the mid to upper 70s. So naturally it got me even more excited about fall and everything that comes with it.

So, here are some things that I cannot wait to indulge in this fall.

1. Fall fashion by forever21

Chiffon is really making a statement this season and I love it.

Source

These flowy boyfriend style chiffon button ups are everywhere and I will definitely be purchasing this one for only $13.50 from forever21. Isn't the color stunning?

I also came across this chiffon maxi skirt from forever21. So chic.

Source

Blazers. Blazers! Blazers!!
There are so many different options out there with blazers. Everyone is carrying them in so many styles, colors and patterns! Wear it with a dress, some shorts and a blouse or skinny jeans and a white v-neck for a more casual look. Check out this soft peach blazer from forever21.

Source

BONUS:
Boyfriend style watches are huge, and have been for awhile now. From what I've seen, Michael Kors is one of the key designers of this trend. I really love this Runway Time Teller Watch from Michael Kors. The rose gold is flawless.

Source

2. Pumpkin treats

My boyfriend almost lost it when I came across these pumpkin cream cheese truffles from lilllyella. We love cooking together and we will definitely be making these this fall. YUM.

Source

Pumpkin pie cupcakes from Une-deux sesnses...no explanation needed.

Source
and finally...a pumpkin pie cocktail from Cocktail Times. Simple and unique. Can't wait to try it.

Source

3. Easy & fun decorations

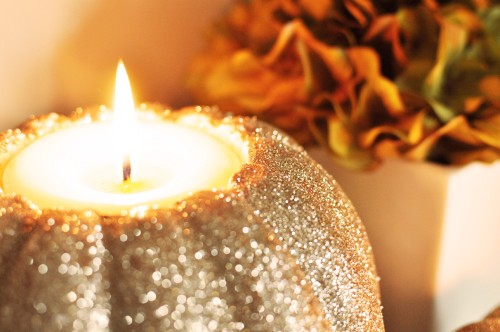
Glitter Pumpkin DIY from Twig & Thistle

Source

Pumpkin Party Cooler from Martha Stewart

Source

Man! Writing this has made me even more eager for fall to get here. It's such a great time of year. I even love the way it smells :)

Feel free to share what you are excited about for this upcoming fall!

That's all for now
Bye, friends!

ps. The first day of fall is September 23!

Friday, September 9, 2011

DIY Dessert Stand

These past two weeks have been so wonderful and SO busy! I am so glad to be back at school for my last full semester as a college student. (AH!)

The week before classes started I got in a really crafty mood. I redid my room and did lots of thrift shopping! Some of my thrift store finds inspired me to create a cute and simple dessert stand that I saw on pinterest. (uh duh)

Materials:
Plate
Glassware with a stem (Lots of options!)
-- The plate and cup that I used cost me around $3 at a local antique store and I probably could have found even cheaper options at goodwill.
Silicone Sealant (This may sound scary but it so easy to find and so easy to use! I got mine at Wal-mart.)
Frost glass spray
Spray paint (Any color!)


I started by centering the glass on the plate and making marks with a sharpie.


Then I secured the glass to the plate with the silicone.

Read the instructions on your silicone to know how long to let it sit. I let mine sit over night.


Once the silicone is dry, apply the frost glass spray. This helps the spray paint stick.


Let dry then apply spray paint. Several coats may be needed.


Creative, cute, simple, EASY. Love it. I am having a few problems with the spray paint chipping, but I think it has something to do with type I bought. I would also like to make some in fun colors :)

Lots of inspiration for the blog, being back at school and all, so hopefully I'll be posting more frequently!

That's all for now..
Bye, friends!

Friday, August 26, 2011

My Summer Internship

Time to do some shameless promotion of The Winfield Inn! This is where I did my internship this summer as a wedding coordinator intern.

Check out the website and the blog :) (I worked on the blog some)

If you're needing a fabulous outdoor venue in the Austin area with AMAZING food and even better staff, then you should definitely look into The Winfield. I have enjoyed working there this summer and would recommend it to any bride! 

The Winfield Inn takes care of the details that you would never think of. Things like, making a to-go plate of food for the bride and groom to have at their hotel, helping you stay on top of your itinerary by communicating with the DJ, saving the bride and groom a piece of cake, or lining up the guests for the exit! The staff are so helpful and wonderful people to be around on your big day!

Here's a picture of the stunning ballroom where receptions and occasionally ceremony's are held.

Source
This is the gazebo where most ceremonies take place.


This photo is from a wedding that was featured on the wedding blog Style Me Pretty! Check it out here. (Notice the succulents in the bouquets. Gorgeous!)

Here are some inspiration boards that one of the head coordinators, Robyn made with pictures from previous weddings using Two Bright Lights (Thank you Studio 563 for utilizing the source!)


I finished up my internship on August 19th. It was bittersweet as I am glad to be back home but already miss my Winfield family dearly.

I hope you enjoyed this glimpse into my summer.
Bye, friends! 

Wednesday, August 10, 2011

DIY Etsy Inspired Necklace

Little kids always have their quirks and odd obsessions. One of my many was oven-bake clay. I loved working with my hands and I loved being creative. I made everything from jewelry for my teachers to a nativity set for my parents to an entire menus worth of sushi -- all from oven-bake clay.

As I was wandering around pinterest one day I found a picture of a cute, fun necklace that was being sold on Etsy for $40. This inspired me to take a stroll down memory lane and try to make one myself.

My favorite brand of clay is Sculpey. It is what I worked with when I was a little girl and it is what I wanted to work with on this project! I am really into neutrals right now so I chose Beige, Tan and Brown.


The execution was extremely simple. I rolled the clay into a little ball, flattened it out and poked a hole in the center. The great thing about this particular oven-bake clay is that it doesn't shrink or expand in the oven so you don't have to worry about the holes shrinking and not fitting your string.


I made 5 beads in each color (odds are more interesting than evens) and once they were molded appropriately I put them in the oven at 275 for about 14 minutes. (No, I didn't make that up, I read the instructions.)

Once they were done baking I let them cool and then strung them immediately. I just used a neutral colored cord and it worked nicely. Depending on what look you are going for their are lots of options for what you string your beads on.

Here was my initial final result..


I later decided to make smaller beads and add them to the necklace in order to add more dimension, and here is the final, final result.. (sorry that the colors look so different. the picture below is more accurate)


I really like the neckalce and would like to make more in different colors. I think it looks like something you could find at the jewelry section in an antique store!

The cost of this project was less than $6 and I had lots of clay left over for more projects.

Some ways to reinterpret this idea:
1. A small number of larger beads (3 or 5) on a longer string
2. Add pops of bright, interesting colors
3. Put the beads on a chain and see if you can make it work with an interesting outfit
4. Fill half a string with all small beads
5. Same beads with a longer string

If you make something similar to what I made or any of the interpretations I would love to post them. So feel free to send pictures my way with descriptions of how and why you did it the way you did!

Thanks for reading.
Bye, friends!

Thursday, August 4, 2011

Wedding Trends

If you know me, you know I love all things wedding. I am interning at a wedding venue this summer and have been faithfully keeping track of wedding trends as much as possible with the help of blogs and of course, pinterest.

So I decided to do a post about some of my current favorite wedding trends!

1. Succulents

Photo Source: Style Me Pretty

I have become very interested in the floral aspect of weddings and really love succulents. They are starting to show up not only in bouquets but center pieces, boutonnieres and ceremony decor as well.

In my opinion, succulents are extremely versatile and can be used for any season and according to my research they do well growing in all types of weather. I think they are so unique! And apparently, they aren't much of a new trend and were used often by the victorians.

2. Hanging jar backdrop

Photo Source: Wedding Bee

This is stunning. You can fill the jars with candles, flowers, rocks, beads or really anything you can think of that would match your decor. I love the look and think it can add layers and dimensions to any ceremony style.

3. Dessert Tables

Photo Source: Jesi Haack Design

It is so easy to get caught up in the wedding cake when planning a wedding. But, I am really loving the idea of including all types of desserts in the reception. Not everyone likes cake but including some cookies, brownies, & lemon bars in your menu could really appeal to and impress your guests. (Not to mention it gives room to show off more of your wedding style)

This is something that I would enjoy incorporating this in my own wedding someday but would like to still include a 2 layer cake as to keep with tradition and to have some to celebrate with on our 1 year anniversary.

-- I can't wait to see other trends that show up for the fall wedding season!

That's all for now. Bye, friends!

Tuesday, July 26, 2011

The Funniest Thing

I already shared this on my twitter (and through my group text) but I simply could not resist doing a mini blog post about it..

Photo from The Chive

I rrreeally hope you are laughing hysterically right now. If not, give it a second.

Yup. It's hillarious. You will be laughing about it for the next week. You're welcome. 

Bye, friends.